Exploring the Power of String-Based Switch Statements
Traditionally, Java’s switch statement has been employed primarily for handling primitive data types such as integers and characters. However, with the increasing complexity of software requirements, the demand for switching on strings, which are a common data type in everyday programming tasks, has seen a substantial surge. Thankfully, with the introduction of Java 7, developers were finally bestowed with the ability to incorporate strings into their switch statements.
Within this article, we shall embark on an enlightening journey to delve into the intricacies of employing string-based switching in Java. Our expedition will encompass a comprehensive exploration of the syntax, advantages, practical applications, and optimal strategies associated with this formidable addition to the Java programming language. Whether you’re an experienced Java developer or a novice commencing your programming voyage, mastering the art of leveraging string-based switching is bound to augment your proficiency in Java significantly. Therefore, let us plunge headfirst into the depths of this feature and unlock its potential to facilitate the creation of more succinct, intelligible, and efficient Java code.
The Evolution of Java Switch Statements
In the realm of Java programming, switch statements serve as powerful tools for decision-making. However, they haven’t always been as versatile as they are today. Up until Java 1.6, switch statements came with a rather restrictive condition: the expression used within them must belong to certain categories.
Here’s a breakdown of the expression requirements before Java 1.6:
- Integral or Enumerated Types: Switch statements could only accept expressions of integral or enumerated types, such as byte, short, char, or int;
- Class Types with Conversion Functions: There was a workaround for using class types within switch statements. If a class had a single conversion function that could transform it into an integral or enumerated type, it could be used as an expression.
Now, let’s explore this in more detail and see how switch statements have evolved over time.
Java Switch Statements: A Closer Look
1. Integral and Enumerated Types
In the early days of Java, switch statements primarily revolved around integral and enumerated types. These are numeric data types and user-defined data types with a predefined set of constant values, respectively. Some insights into this aspect include:
- Integral types include byte, short, char, and int;
- Enumerated types are user-defined types that consist of a fixed set of constant values. They were introduced in Java 5 through the ‘enum’ keyword.
2. Class Types with Conversion Functions
To work with non-integral or non-enumerated types within switch statements, developers had to implement a somewhat unconventional approach. If you had a class that didn’t fall into the integral or enumerated category but could be converted into one, you could use it as an expression. Key details regarding this approach:
- The class in question had to provide a single conversion function capable of transforming it into an integral or enumerated type;
- This allowed developers to work with class types more flexibly within switch statements.
Switch Statement Syntax
Now that we’ve explored the historical context, let’s get into the nitty-gritty of the switch statement’s syntax and structure. This is crucial for anyone looking to harness its power effectively.
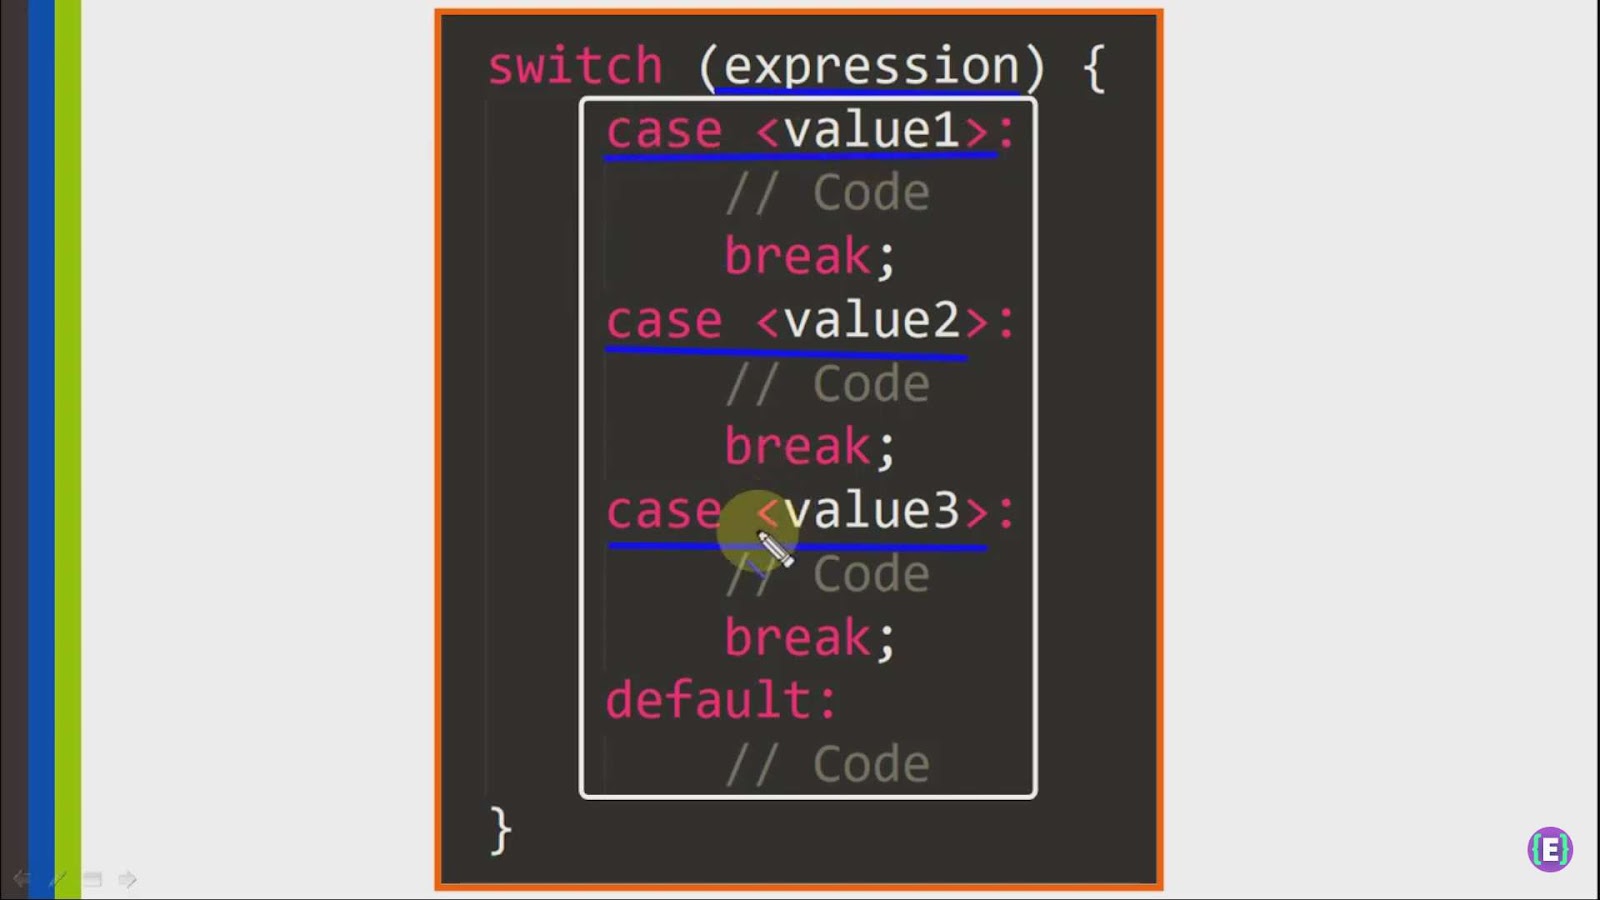
Basic Syntax: A switch statement in Java follows this basic structure:
switch (expression) {

    case value_expression_1:

        // Statements to execute for value_expression_1

        break; // Optional

    case value_expression_2:

        // Statements to execute for value_expression_2

        break; // Optional

    // You can have any number of case statements

    default: // Optional

        // Statements to execute if none of the cases match

}
Unlocking the Power of String-Based Switch Statements in Java 7
In Java 7, a significant enhancement was introduced in the switch statement that allowed expressions of type String to be used as case values. This new feature made the switch statement more versatile and useful for handling a wide range of scenarios. Let’s delve into the details of how this works and explore some practical examples.
The Enhanced Switch Statement in Java 7
In traditional Java switch statements, you could only use integral types (byte, short, char, int) as case values. However, with the advent of Java 7, you can now use String objects as case values. This expansion in functionality opened up new possibilities for developers, especially when dealing with user input or string-based decision-making.
How to Use Strings in a Switch Statement
To leverage this feature, you should follow these steps:
- Create a switch statement as usual;
- Specify the expression you want to evaluate, which in this case is a String;
- Define your cases using String literals;
- Perform the desired actions within each case block.
Let’s explore an example to illustrate this concept further:
class A {

    public static void selectString(String s) {

        switch (s) {

            case "AAA":

                System.out.println("AAA is selected");

                break;

            case "BBB":

                System.out.println("BBB is selected");

                break;

            case "CCC":

                System.out.println("CCC is selected");

                break;

        }

    }

}

public class Test {

    public static void main(String[] args) {

        A a = new A();

        a.selectString("AAA");

    }

}
In the code above, we have a class A with a method selectString that accepts a String argument. Inside the method, we use a switch statement to evaluate the value of the input String s. Depending on the value of s, a specific message is printed to the console.
Before JDK 7: Simplifying Code with Switch Statements
In the era before JDK 7, writing concise and efficient code for handling multiple conditions often proved to be a challenging task. Developers had to resort to a series of “if” statements, as illustrated in the code snippet below. This approach, while functional, was far from ideal in terms of readability, maintainability, and efficiency.
The Old Way: A Class with Multiple “if” Statements:
class A {

    public void selectString(String s) {

        if (s.equals("AAA")) {

            System.out.println("AAA is selected");

        }

        if (s.equals("BBB")) {

            System.out.println("BBB is selected");

        }

        if (s.equals("CCC")) {

            System.out.println("CCC is selected");

        }

    }

}

public class Test {

    public static void main(String[] args){

        A a = new A();

        a.selectString("AAA");

    }

}
In this legacy code, we see multiple “if” conditions to check the value of the string and execute specific actions accordingly. While it gets the job done, it’s far from being an elegant solution.
Introducing JDK 7 and Beyond: The Switch Statement Revolution
With the release of Java Development Kit (JDK) 7, developers were presented with a more elegant and efficient solution for handling multiple conditional cases: the “switch” statement. This powerful construct simplifies code, enhances readability, and can significantly improve performance when dealing with numerous options.
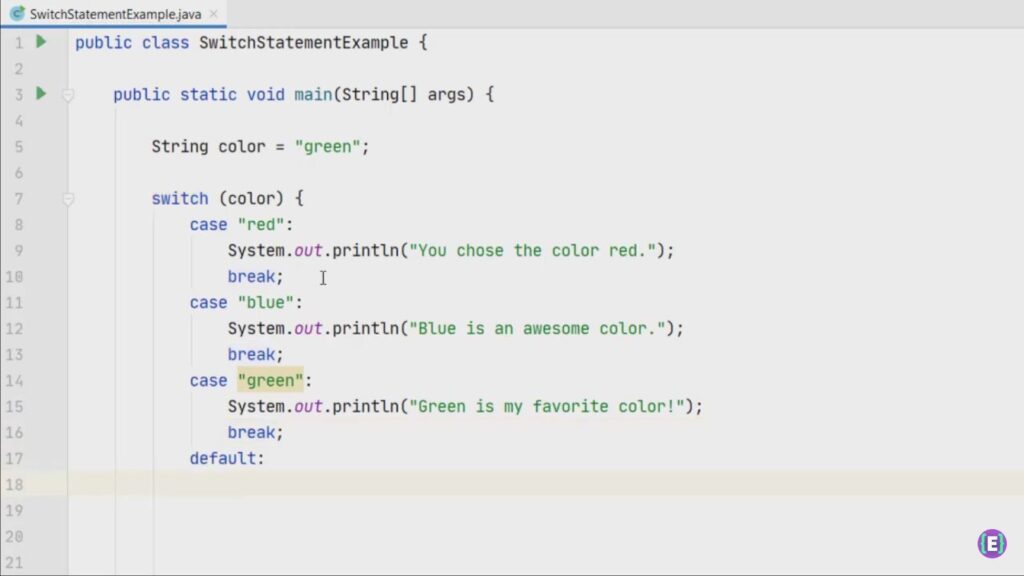
The Modern Approach: Utilizing the “switch” Statement
class A {

    public void selectString(String s) {

        switch (s) {

            case "AAA":

                System.out.println("AAA is selected");

                break;

            case "BBB":

                System.out.println("BBB is selected");

                break;

            case "CCC":

                System.out.println("CCC is selected");

                break;

            default:

                System.out.println("Unknown selection");

        }

    }

}

public class Test {

    public static void main(String[] args){

        A a = new A();

        a.selectString("AAA");

    }

}
In this revised code, we’ve embraced the “switch” statement, transforming the code into a cleaner and more efficient version. Also, unravel the world of Java with our comprehensive guide on its diverse packages. Simplify and enhance your coding journey today!
Conclusion
In conclusion, we have ventured into the realm of utilizing string-based switching in Java, uncovering its syntax, benefits, diverse applications, and recommended practices along the way. This newfound capability, introduced with Java 7, has broadened the horizons of Java programming. Whether you are a seasoned Java developer or just starting your journey, embracing the power of switching on strings is a valuable skill that can enhance the quality and readability of your code. By mastering this feature, you are poised to write code that is not only more concise but also more efficient, ultimately bolstering your proficiency in the Java language. As we conclude our exploration, we encourage you to incorporate string-based switching into your programming arsenal, unlocking its potential to elevate your Java repertoire.